
To complete this wiring journey as fast as possible, here's three posts in one day.


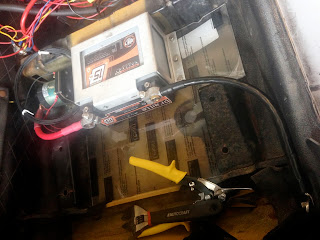
Once the area was cleared out, the completed box was installed.


I don't exactly know what I was going for in the beginning, but this was it.


Measured and cut the power wire for the disconnect, removing the insulation with a razor. It fit very snugly into the fitting, but stayed in place while crimping with a vice. I don't show this hear, but I also covered every joint with heat shrink tubing. See detail further below and installed photo's.


Back inside the car, I cleaned out the area where the battery would be returned, even vacuuming with a shop vac.


Bam.


Note the use of heat shrink tubing above, as well as the ground wire install in a similar fashion going to the seat belt mounting bolt. The wires were so thick I had to use them in the direction they were coiled in the box, but after all was said and done they fit very well. I also had to drill open the fitting slightly to fit this large ground bolt.
Over in the engine bay, removed 1oo layers of electrical tape around the current power wire and engine harness connection that presumable goes to the starter and other various sensor connections.

I straightened the joint on the oem side so that it wouldn't have that 9o* kink in it when connected to the new power wire.


I replaced the hardware, and dremelled the excess bolt to size after torquing the connection straight.


Finally I wrapped the entire junction very tightly with black electrical tape...

...and then red heat shrink tubing.


This took a bit more heat to contract around the joint, so there was a bit more carbon during heating, most coming off easily with a hand wipe.

I then disconnected all the wires, taping and numbering either side of the connection, and removed the entire nest!


I don't even know what to say other than, FINALLY <all while letting out a sigh of relief>.


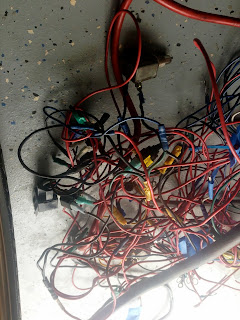

I'm impressed on a number of levels, from astonishment she ran on the nest above, kept running without any serious failures, "Dendy, do you smell that? Is your seat on fire?!", to how I was able to keep track of all the connections in the correct places and able to troubleshoot when needed, not to mention passengers feet not inadvertently ripping it all out on a date. The astonishment continued throughout the evening, deciphering each label and wire one by one, remapping the "painless" wiring diagram with my own circuits and toggles.


It's calming it's so clean.
But back to installing the fuse box and all the connections.


I wired the switches inline to the appropriate circuits I commandeered in the fuse box. I had to add two ground junction blocks and one power block to the wiring. Now only two additional wires go to the ground terminal, which ground blocks that in turn ground all the gauges, controllers, and wide-band. The power lines to the fuse box comes from a power block attached to the main line before the disconnect.
I haven't ziptied and bundled the wires yet, as I still haven't connected all the accessories, such as the door poppers, interior lights, or horn, namely because those items aren't installed in the car yet either. I took a lot of effort to cut to length and route wires in the same path and keep them together. Eventually the plan is to group them, tie them, and tuck them away under the bottom of the transmission vinyl. This will allow routing from under the seat to the switch panel and the engine bay. I don't currently plan on more of a dash or carpet.
Before you ask, the ECU is not mounted yet. I originally thought it could be tucked inside the ammo box, but after installing the switches and the rest of the wiring this was obviously not going to be possible. New idea is to mount it behind the battery under the seat to the tray everything else is mounted to. This will give it some airflow as well, always important, but until I can get a hold of a 3o-prong firewall plug to extend the wires and reroute the ECU, it's not going anywhere.


She runs, and in two weeks both goals were ticked. TC rod was connected and wire nest was removed. Between the above and below pictures, I went to the Spring 2013 Import Alliance show in Atlanta, GA. Photo's of that to follow. I also had a fun night of aligning the front suspension with our very own alignment kit, which I will also cover in detail later.
Special thanks to Giffin.


Once the area was cleared out, the completed box was installed.


I don't exactly know what I was going for in the beginning, but this was it.


Measured and cut the power wire for the disconnect, removing the insulation with a razor. It fit very snugly into the fitting, but stayed in place while crimping with a vice. I don't show this hear, but I also covered every joint with heat shrink tubing. See detail further below and installed photo's.


Back inside the car, I cleaned out the area where the battery would be returned, even vacuuming with a shop vac.


Bam.


Note the use of heat shrink tubing above, as well as the ground wire install in a similar fashion going to the seat belt mounting bolt. The wires were so thick I had to use them in the direction they were coiled in the box, but after all was said and done they fit very well. I also had to drill open the fitting slightly to fit this large ground bolt.
Over in the engine bay, removed 1oo layers of electrical tape around the current power wire and engine harness connection that presumable goes to the starter and other various sensor connections.

I straightened the joint on the oem side so that it wouldn't have that 9o* kink in it when connected to the new power wire.


I replaced the hardware, and dremelled the excess bolt to size after torquing the connection straight.


Finally I wrapped the entire junction very tightly with black electrical tape...

...and then red heat shrink tubing.


This took a bit more heat to contract around the joint, so there was a bit more carbon during heating, most coming off easily with a hand wipe.

I then disconnected all the wires, taping and numbering either side of the connection, and removed the entire nest!


I don't even know what to say other than, FINALLY <all while letting out a sigh of relief>.


I'm impressed on a number of levels, from astonishment she ran on the nest above, kept running without any serious failures, "Dendy, do you smell that? Is your seat on fire?!", to how I was able to keep track of all the connections in the correct places and able to troubleshoot when needed, not to mention passengers feet not inadvertently ripping it all out on a date. The astonishment continued throughout the evening, deciphering each label and wire one by one, remapping the "painless" wiring diagram with my own circuits and toggles.


It's calming it's so clean.
But back to installing the fuse box and all the connections.


I wired the switches inline to the appropriate circuits I commandeered in the fuse box. I had to add two ground junction blocks and one power block to the wiring. Now only two additional wires go to the ground terminal, which ground blocks that in turn ground all the gauges, controllers, and wide-band. The power lines to the fuse box comes from a power block attached to the main line before the disconnect.
I haven't ziptied and bundled the wires yet, as I still haven't connected all the accessories, such as the door poppers, interior lights, or horn, namely because those items aren't installed in the car yet either. I took a lot of effort to cut to length and route wires in the same path and keep them together. Eventually the plan is to group them, tie them, and tuck them away under the bottom of the transmission vinyl. This will allow routing from under the seat to the switch panel and the engine bay. I don't currently plan on more of a dash or carpet.
Before you ask, the ECU is not mounted yet. I originally thought it could be tucked inside the ammo box, but after installing the switches and the rest of the wiring this was obviously not going to be possible. New idea is to mount it behind the battery under the seat to the tray everything else is mounted to. This will give it some airflow as well, always important, but until I can get a hold of a 3o-prong firewall plug to extend the wires and reroute the ECU, it's not going anywhere.


She runs, and in two weeks both goals were ticked. TC rod was connected and wire nest was removed. Between the above and below pictures, I went to the Spring 2013 Import Alliance show in Atlanta, GA. Photo's of that to follow. I also had a fun night of aligning the front suspension with our very own alignment kit, which I will also cover in detail later.
Special thanks to Giffin.


No comments:
Post a Comment