
In order to keep track of bolts and nuts, I walked to the local Tesco's and picked up the only thing resembling a ziploc bag. I would label everything small enough to fit that was removed from the car. I've found it makes things much easier when assembling.

Usually before doing something new, I do a bit of research to figure out if I have the right tools, time, and effort for the procedure.


This was the best how-to, and it no longer had pictures, but thank you TomM of sxoc.com.

Even he said it was a ballache. Hopefully mine would be ok.


Yes. Spiders are still going at it.


Quick overview. Horns and inner headlight bolts and zip-ties.

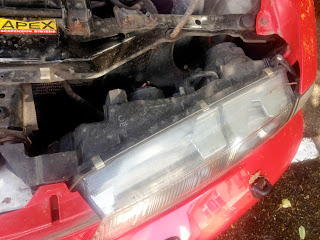


Outer upper side marker screws and side marker closeups.


The passenger side headlight and horn was bolted with two thick spacers, through the middle hole in the headlights. The driver side headlight and horn used the upper hole, zip-ties, and washers instead. It was also a 12-11 mm sized bolt and nut, rather than the 1o - 1o on the passenger side.
I began with the center grill between the headlights.


Step 1, pull out center grill by squeezing the flexible retaining bit of the lower clip and pushing with a minimal amount of force. The driver side did not have the upper grey clip, but the passenger side did.


I pulled the clip out of the car and placed it back inside the grill.

Set the grill aside, or on top of the engine where everything else is.


Step 2, unbolt and cut zip-tie of the inner headlights and horn. I'm all about zipties, but usually not in the place of bolts, especially when there are already bolt holes.


Step 3, unplug the horns and lay them aside.


Step 4, 5, 6 unscrew side marker, rotate it outwards from the fender, and unplug.


7, 8, 9 repeat 4, 5, 6 on the passenger side and place side markers with horns, center grill, and the rest of the tools on top of the engine.


Step 10 and 11, remove (2) nuts on either outer side of the headlights.


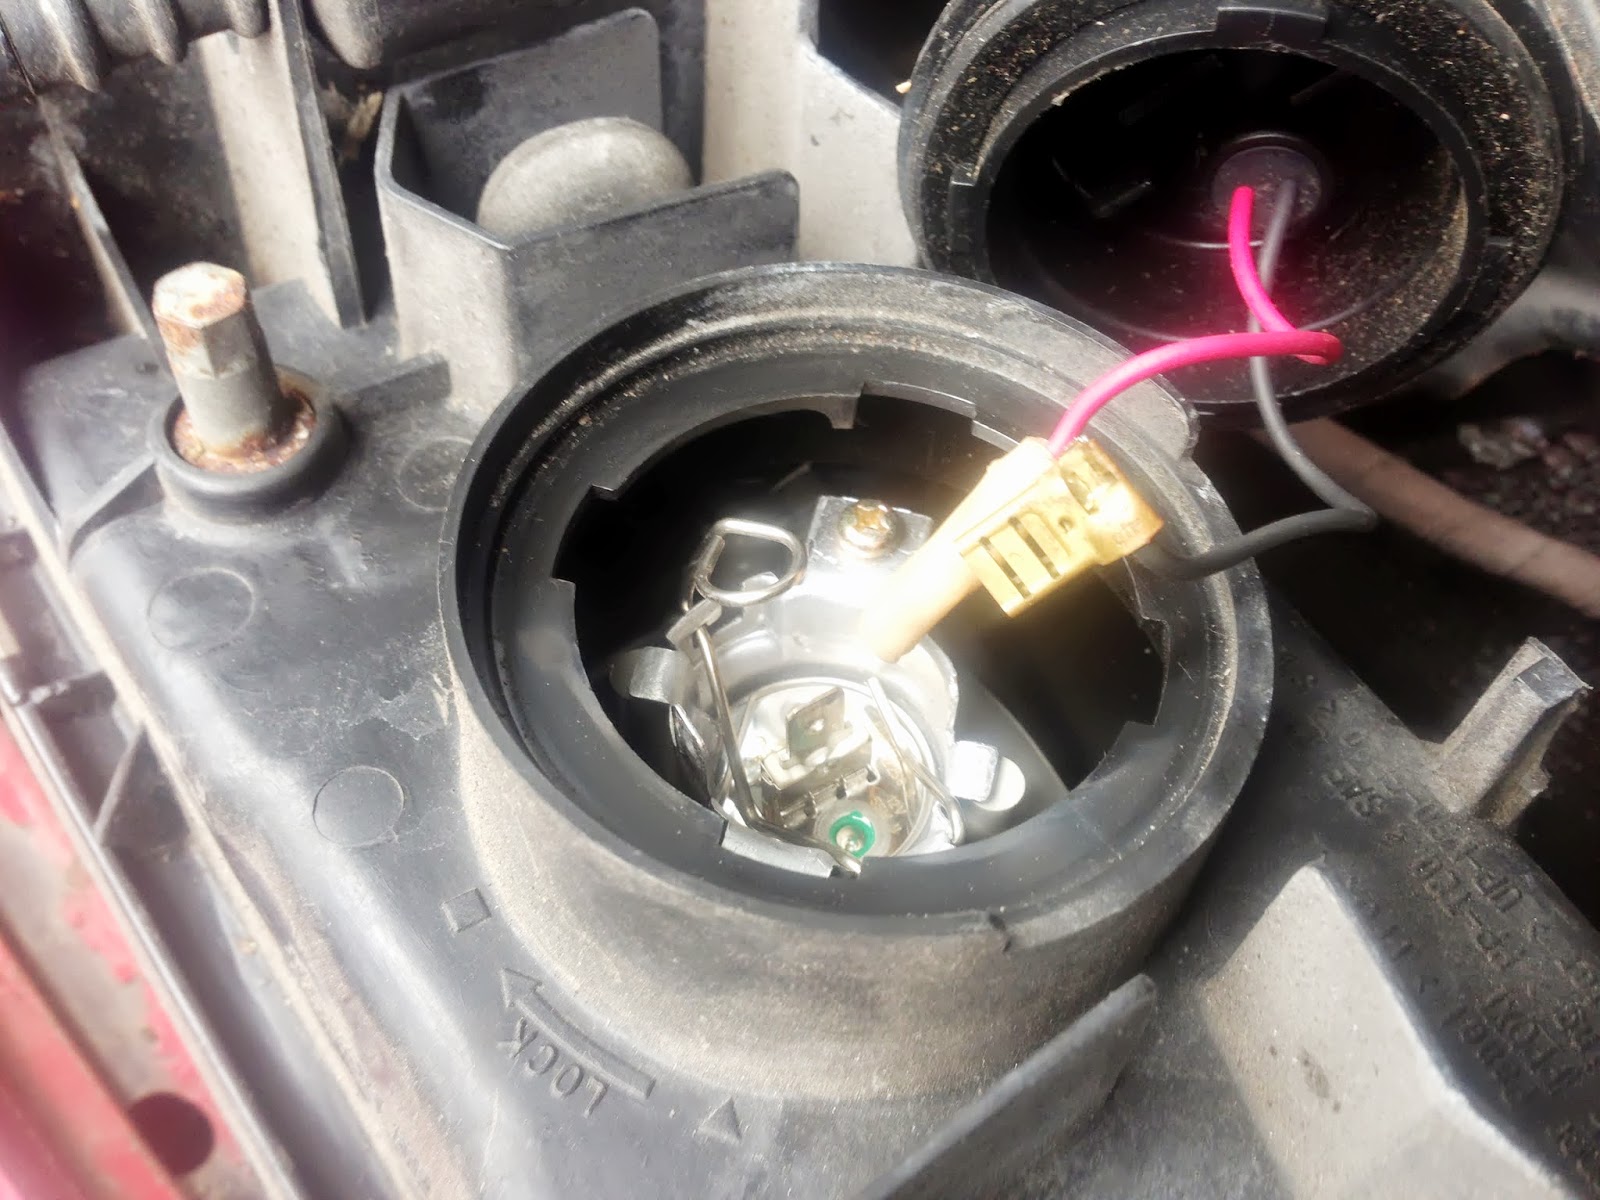
Step 12, unplug the standard light bulb from the bulb.


Step 13, gawk at the HIDs before putting it back in and unplugging it from the harness instead.

14, this next plug took me about 2o minutes to disconnect. When all was said and done I ended up having to use a flat head screwdriver perpendicular to the face of the plug against the outer clip.


Push between the inner clip and the outer housing as hard as you can and pry outward.
Viola.


I thought the inner clips were stuck and even tried to use a small Allen wrench to push them in. This was ineffective, stick with the large screw driver.

It's hard to see, but disappointingly the driver side headlight housing suffered some light scratching. This was either already like this, or more likely caused my by time spent detaching it from opposite side. Super frustrating. It's like those clips that you have to break just to figure out how they detach so you know how to not break them. I spent forever on that clip to save it and managed not to break any, which I think was impressive considering the next few steps, but nothing is free.
There seems to be many solutions for buffing them though so check back at a later date.

Repeat steps 12, 13, and 14 on the passenger side, hopefully much more quickly. It was considerably, as it only took about 1o seconds in total once knowing how the plug worked.


Remove front outer bumper nuts. Step 18?


Step 19 and 20, remove the rusted bolt, washer, nut combo from the inner wheel wells attaching the bumper to the fenders on either side. This is actually a flat head screw driver bolt. Worst ... Idea ... Ever.
The nut and washer are on the top fender side, while the screw head on the bottom bumper side is impossible to turn to loosen while holding the nut still. Before breaking down and buying a Dremel, the passenger side bolt head, and I use that word loosely about a flat head fastener, simply passed through the bumper, releasing the rear corner.
The driver side took a little more force, but was able to pass through with minor convincing, and no broken tabs. These will be replaced with true nuts and bolts in the future.


Step 21 and 22, unplug the fog lights on each side.


Step 23, pull bumper off studs in Step 18.


I think there were more steps and bolts that weren't there as opposed to the referenced how-to. There was an obvious lack of bolts on two inner frame pieces sticking out around the sides of the intercooler, but I can't complain. I also didn't have lower engine dust shields.
Overall it took about an hour, and after one brief rain scare, started raining just I pulled her off.
I do like the intercooler, it takes up as much space as it could without obvious cutting of the core supports. I'll inspect and report later when it stops raining.


Yes. I have a full s14a bumper in my flat that must be negotiated before finding the bathroom. As you do. Just don't trip on her while rounding the corner.


I don't know if you can count clean-up and bringing the bumper inside as steps, but if you do you're still at or under 25. Not too bad.
Side note, the fog light on the passenger side is cracked, this one completely not my fault.

Usually before doing something new, I do a bit of research to figure out if I have the right tools, time, and effort for the procedure.


This was the best how-to, and it no longer had pictures, but thank you TomM of sxoc.com.

Even he said it was a ballache. Hopefully mine would be ok.


Yes. Spiders are still going at it.


Quick overview. Horns and inner headlight bolts and zip-ties.


Outer upper side marker screws and side marker closeups.


The passenger side headlight and horn was bolted with two thick spacers, through the middle hole in the headlights. The driver side headlight and horn used the upper hole, zip-ties, and washers instead. It was also a 12-11 mm sized bolt and nut, rather than the 1o - 1o on the passenger side.
I began with the center grill between the headlights.


Step 1, pull out center grill by squeezing the flexible retaining bit of the lower clip and pushing with a minimal amount of force. The driver side did not have the upper grey clip, but the passenger side did.


I pulled the clip out of the car and placed it back inside the grill.

Set the grill aside, or on top of the engine where everything else is.


Step 2, unbolt and cut zip-tie of the inner headlights and horn. I'm all about zipties, but usually not in the place of bolts, especially when there are already bolt holes.


Step 3, unplug the horns and lay them aside.


Step 4, 5, 6 unscrew side marker, rotate it outwards from the fender, and unplug.


7, 8, 9 repeat 4, 5, 6 on the passenger side and place side markers with horns, center grill, and the rest of the tools on top of the engine.


Step 10 and 11, remove (2) nuts on either outer side of the headlights.


Step 12, unplug the standard light bulb from the bulb.


Step 13, gawk at the HIDs before putting it back in and unplugging it from the harness instead.

14, this next plug took me about 2o minutes to disconnect. When all was said and done I ended up having to use a flat head screwdriver perpendicular to the face of the plug against the outer clip.


Push between the inner clip and the outer housing as hard as you can and pry outward.
Viola.


I thought the inner clips were stuck and even tried to use a small Allen wrench to push them in. This was ineffective, stick with the large screw driver.

It's hard to see, but disappointingly the driver side headlight housing suffered some light scratching. This was either already like this, or more likely caused my by time spent detaching it from opposite side. Super frustrating. It's like those clips that you have to break just to figure out how they detach so you know how to not break them. I spent forever on that clip to save it and managed not to break any, which I think was impressive considering the next few steps, but nothing is free.
There seems to be many solutions for buffing them though so check back at a later date.

Repeat steps 12, 13, and 14 on the passenger side, hopefully much more quickly. It was considerably, as it only took about 1o seconds in total once knowing how the plug worked.


Remove front outer bumper nuts. Step 18?


Step 19 and 20, remove the rusted bolt, washer, nut combo from the inner wheel wells attaching the bumper to the fenders on either side. This is actually a flat head screw driver bolt. Worst ... Idea ... Ever.
The nut and washer are on the top fender side, while the screw head on the bottom bumper side is impossible to turn to loosen while holding the nut still. Before breaking down and buying a Dremel, the passenger side bolt head, and I use that word loosely about a flat head fastener, simply passed through the bumper, releasing the rear corner.
The driver side took a little more force, but was able to pass through with minor convincing, and no broken tabs. These will be replaced with true nuts and bolts in the future.


Step 21 and 22, unplug the fog lights on each side.


Step 23, pull bumper off studs in Step 18.


I think there were more steps and bolts that weren't there as opposed to the referenced how-to. There was an obvious lack of bolts on two inner frame pieces sticking out around the sides of the intercooler, but I can't complain. I also didn't have lower engine dust shields.
Overall it took about an hour, and after one brief rain scare, started raining just I pulled her off.
I do like the intercooler, it takes up as much space as it could without obvious cutting of the core supports. I'll inspect and report later when it stops raining.


Yes. I have a full s14a bumper in my flat that must be negotiated before finding the bathroom. As you do. Just don't trip on her while rounding the corner.


I don't know if you can count clean-up and bringing the bumper inside as steps, but if you do you're still at or under 25. Not too bad.
Side note, the fog light on the passenger side is cracked, this one completely not my fault.