
I realize it's been a while since regular posts on the 24o z. I know, I'm even behind on blog following if you can believe it. Since building the majority of the car, I've relocated to the UK. Of course the second things are running well, the goon (still static and untouched) and z end up in a rather large storage unit, to be seen in a later post.
Work is currently up in the air, so over the next few months we'll see what transpires. I may actually come back to the States sooner rather than later, in which case the frequency of z posts will increase as there's still a long list. If not in the States though, I'll only be able to play with the z during visits which may not include major work days, or play days, but I'll try to supplement with random s13 posts or foreign car shots until one or the other happens.

Always start with engine prons.

And painless prons. After a lot of research into 8o's style rocker switches, star trek style glow push switches, even exterior boat panel switches, I ordered (2) 8 toggle switch painless kits (which came with everything) and (1) 14 circuit remote fused micro painless wiring kit. I also have a 0/1 trunk battery relocation summit wiring kit even though the battery is only under the seat, and a painless electronic remote disconnect with toggle. The remote disconnect did cost a bit more than the large switches that are normally seen for disconnects, but this was going to be an in-car switch and everything else was painless. I also liked the idea of having it match all the other toggles, not to mention the idea of not having to run a main power wire up to the switch mounting location, and back.


Another shameless engine shot. Wiring was was done at Giffin's new place over Thanksgiving during a trip back to the States as he was laid up after surgery. Luckily this also coincided with his Subaru getting work at the dealer so the z had garage time.
I was getting tired of the array of switches all over the passenger floor, not to mention the inconsistency of not having a fuse box, so new wiring was a must. It was always planned, and is a huge part left to make the z reliable. As in previous wiring posts, I wired it to work and this was the time to start the finishing touches.
I had no desire to install a full oem dash as it is not in any condition to do so, not to mention I like the interior bare, so I had to figure out how to install gauges and a switch panel or two.

Insert old 5o cal ammo box, which still has sand on it from use. No, I did not clean it off.
As it turns out, the panels fit perfectly from the bottom of the box to the base of the top flange when installed flush.
Instead of cutting large windows and mounting the included toggles into the faceplates, I thought it would give it more structure and support to drill each hole, and install the switches through the ammo case. Of course it was more difficult to measure, align, center, drill, and open up each hole when not all 16 toggles fit at the same time, but in the end it worked out very well. For those of you wondering, the faceplates are not at all flexible, actually impressively pretty thick aluminum, and when mounted flush as I drilled the holes, the exact location of the upper ones affected the lowers.

The faceplates were actually so thick that I used it as a guide to finish off a few of the holes to make a perfect fit.
I then wired the switches of one of the panels, using most of the recommended colors for the switch intentions.


The upper panel is the power panel, the lower the accessory panel, although there are a few toggles on the upper panel that could be considered "accessory." The start toggle is momentary, one was included with each kit. I picked out labels that best matched the use, but as there were no wideband o2, boost controller/turbo timer, or on/off stickers, I went with winch, siren, and alarm. Made sense at the time. The ignition, fuel pump, fan, and gauges, are all on separate toggles. I put them in order of need as far as running the car from left to right, with the exception of the on/off power cutoff switch, all the way on the right side with a toggle condom. I got one to test it out, tell me what you think, seems to work well.
Eventually I would like to get black toggle switch covers for the power panel, but they were a bit expensive so I saved that for later.


I kept all the wiring connects the same, on the same sides of the switch, all the the same orientation. The panel kits came pre-wired and to length. when connecting banks of 4, 2 wires are a little longer and should be used for the outer switches.
Also, labels had to be angles in order to fit above all the switches in the same line without overlapping and getting weird.


Break.

The faceplate mounting holes came pre-drilled so I also drilled the ammo box to match and used them, even though with all toggles in place, the faceplates weren't going anywhere.


The turn signal and exterior light switches are the same double switch type but wired differently. All of the other toggles are single use, off down, on up. The turn signal toggle though turns on the left blinker when down, and right when up. The light switch is setup like an if/else if however, when down only the aux lights are on, but when up both the aux lights and headlights are on. Both of these toggles are off in the middle position. On a side note, the horn is a momentary switch as well.

The other apparent issue with using this many switches on 2 identical panels is that they have identical wire colors. I overlapped obviously different toggle uses and used two that were extra from the upper panel on the lower.
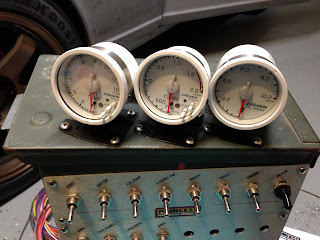
Next I positioned the gauges (the same boost, egt, and oil p from the 28o build) on the ammo box lid in front of the handle angled at approximately 3o degrees. This came from test fitting the box in it's installed position in front of the shifter on the transmission tunnel and sitting in the driver seat.
Note the awesome desert sand.


Bam.


I replaced the wimpy shinny mounting screws for the faceplates with meaty matte stainless steel metal screws, using the same for the gauges.
Finally I had to position the profecB and turbo timer somewhere, the first step of which was removing it from the mess in the car and remembering how they were wired.


Option 1.


Option 2.

Option 3.


Option 4.

Option 1 didn't seem like it would look well, easily encroach on the labels below, and wasn't exactly centered in relation to both panels. Option 2 had the same issues as Option 1 except it was centered, but because it spanned both panels would complicate the installation. Simple is always better and there was no way that install was going to look good when it was all said and done. That and it would take forever to cut two separate holes for either of those options. Option 3 spanned both panels but was sideways and not centered at all. I would only lose 2 future switches though. Option 4 only looses 3 switches and is inline in it's own panel.
There are enough switches anyways.


The turbo timer faceplate broke off in a few pieces, no less than 4, including all the button covers, but the mounting opening is snug enough to support both controllers. As it turns out the faceplate can be carefully placed back on and potentially super glued without being able to see the breaks. We'll see how that works out.
It took longer than planned to make the switch panels after work so the switch-ammo-box would have to be wired in another day, as well as the rest of the car's replacement wiring, but at least it's started.


Drilling and wiring lead to cuticle damage.


Work is currently up in the air, so over the next few months we'll see what transpires. I may actually come back to the States sooner rather than later, in which case the frequency of z posts will increase as there's still a long list. If not in the States though, I'll only be able to play with the z during visits which may not include major work days, or play days, but I'll try to supplement with random s13 posts or foreign car shots until one or the other happens.

Always start with engine prons.

And painless prons. After a lot of research into 8o's style rocker switches, star trek style glow push switches, even exterior boat panel switches, I ordered (2) 8 toggle switch painless kits (which came with everything) and (1) 14 circuit remote fused micro painless wiring kit. I also have a 0/1 trunk battery relocation summit wiring kit even though the battery is only under the seat, and a painless electronic remote disconnect with toggle. The remote disconnect did cost a bit more than the large switches that are normally seen for disconnects, but this was going to be an in-car switch and everything else was painless. I also liked the idea of having it match all the other toggles, not to mention the idea of not having to run a main power wire up to the switch mounting location, and back.


Another shameless engine shot. Wiring was was done at Giffin's new place over Thanksgiving during a trip back to the States as he was laid up after surgery. Luckily this also coincided with his Subaru getting work at the dealer so the z had garage time.
I was getting tired of the array of switches all over the passenger floor, not to mention the inconsistency of not having a fuse box, so new wiring was a must. It was always planned, and is a huge part left to make the z reliable. As in previous wiring posts, I wired it to work and this was the time to start the finishing touches.
I had no desire to install a full oem dash as it is not in any condition to do so, not to mention I like the interior bare, so I had to figure out how to install gauges and a switch panel or two.

Insert old 5o cal ammo box, which still has sand on it from use. No, I did not clean it off.
As it turns out, the panels fit perfectly from the bottom of the box to the base of the top flange when installed flush.
Instead of cutting large windows and mounting the included toggles into the faceplates, I thought it would give it more structure and support to drill each hole, and install the switches through the ammo case. Of course it was more difficult to measure, align, center, drill, and open up each hole when not all 16 toggles fit at the same time, but in the end it worked out very well. For those of you wondering, the faceplates are not at all flexible, actually impressively pretty thick aluminum, and when mounted flush as I drilled the holes, the exact location of the upper ones affected the lowers.

The faceplates were actually so thick that I used it as a guide to finish off a few of the holes to make a perfect fit.
I then wired the switches of one of the panels, using most of the recommended colors for the switch intentions.


The upper panel is the power panel, the lower the accessory panel, although there are a few toggles on the upper panel that could be considered "accessory." The start toggle is momentary, one was included with each kit. I picked out labels that best matched the use, but as there were no wideband o2, boost controller/turbo timer, or on/off stickers, I went with winch, siren, and alarm. Made sense at the time. The ignition, fuel pump, fan, and gauges, are all on separate toggles. I put them in order of need as far as running the car from left to right, with the exception of the on/off power cutoff switch, all the way on the right side with a toggle condom. I got one to test it out, tell me what you think, seems to work well.
Eventually I would like to get black toggle switch covers for the power panel, but they were a bit expensive so I saved that for later.


I kept all the wiring connects the same, on the same sides of the switch, all the the same orientation. The panel kits came pre-wired and to length. when connecting banks of 4, 2 wires are a little longer and should be used for the outer switches.
Also, labels had to be angles in order to fit above all the switches in the same line without overlapping and getting weird.


Break.

The faceplate mounting holes came pre-drilled so I also drilled the ammo box to match and used them, even though with all toggles in place, the faceplates weren't going anywhere.


The turn signal and exterior light switches are the same double switch type but wired differently. All of the other toggles are single use, off down, on up. The turn signal toggle though turns on the left blinker when down, and right when up. The light switch is setup like an if/else if however, when down only the aux lights are on, but when up both the aux lights and headlights are on. Both of these toggles are off in the middle position. On a side note, the horn is a momentary switch as well.

The other apparent issue with using this many switches on 2 identical panels is that they have identical wire colors. I overlapped obviously different toggle uses and used two that were extra from the upper panel on the lower.
Next I positioned the gauges (the same boost, egt, and oil p from the 28o build) on the ammo box lid in front of the handle angled at approximately 3o degrees. This came from test fitting the box in it's installed position in front of the shifter on the transmission tunnel and sitting in the driver seat.
Note the awesome desert sand.


Bam.


I replaced the wimpy shinny mounting screws for the faceplates with meaty matte stainless steel metal screws, using the same for the gauges.
Finally I had to position the profecB and turbo timer somewhere, the first step of which was removing it from the mess in the car and remembering how they were wired.


Option 1.


Option 2.

Option 3.


Option 4.

Option 1 didn't seem like it would look well, easily encroach on the labels below, and wasn't exactly centered in relation to both panels. Option 2 had the same issues as Option 1 except it was centered, but because it spanned both panels would complicate the installation. Simple is always better and there was no way that install was going to look good when it was all said and done. That and it would take forever to cut two separate holes for either of those options. Option 3 spanned both panels but was sideways and not centered at all. I would only lose 2 future switches though. Option 4 only looses 3 switches and is inline in it's own panel.
There are enough switches anyways.


The turbo timer faceplate broke off in a few pieces, no less than 4, including all the button covers, but the mounting opening is snug enough to support both controllers. As it turns out the faceplate can be carefully placed back on and potentially super glued without being able to see the breaks. We'll see how that works out.
It took longer than planned to make the switch panels after work so the switch-ammo-box would have to be wired in another day, as well as the rest of the car's replacement wiring, but at least it's started.


Drilling and wiring lead to cuticle damage.


No comments:
Post a Comment