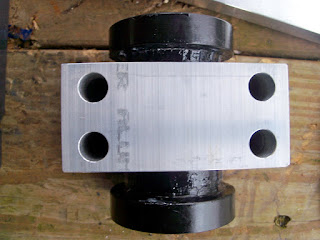
Most parts are from Techno Toy Tuning, but this little bit is from Arizona Z Car. It's a solid isolator mount for the front of the r2oo differential. You wouldn't think so based on how simple it is, but I have some interesting installation notes about this later that I found out about the hard way.
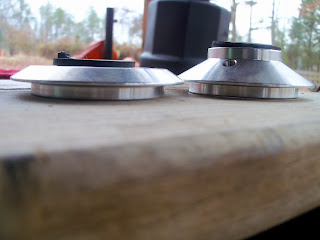
These are the 2 of the 3 versions of coilover top hats that Techno Toy Tuning has. The taller ones are the standard rear top hats, and the flatter ones are a similar design to what is used in the front. The fronts, not shown, have roller bearings in them for swiveling while turning.
Initially I had the taller ones installed on the car. By changing the height of the top hat, the car height will change by that much without having to adjust the lower perch coilover position. This means that if you have a o.75o" shorter top hat, for instance, you can lower the car by that same distance more without having to lower the coilover. The inverse is also true, however, and actually may be more important in my situation.
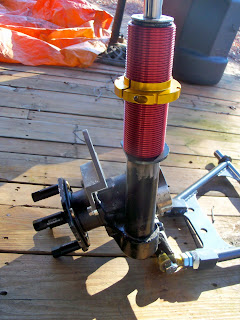
My shock towers are sectioned to the exact height of the shocks, and I have short 8" springs in order to clear the tires. Normally springs are 1o", which would have placed the lower perch 2" lower at the same ride height, which is in the middle of the tire. How much I could lower the car was currently limited when the lower perch touched the top of the inside tire sidewall, but the perch could also not be raised that much without running out of threads at the top of the threaded coilover sleeve. Installing a thinner top hat would lower the car by the difference in top hat heights, but I may not have enough room to raise it back up to a ride-able height. Lets test it.
Here's the side-by-side of the old front differential isolator and bolts next to the new. Huge difference.
It should be noted that you can not re-use your old bolts when installing the new solid mount. The solid mount is threaded, so no nuts are required. This is fine but notice when the OEM bolts are dropped into the differential with one washer on top, part of the shank sticks out. This was fine for the OEM install because the stock isolator would take up this area and the nuts would simply install below into the threaded section. You would have to stack that same height in washers on top, however, in order to pull the threads up enough to be able to thread the bolts directly into the solid isolator and tighten them down as intended.
As stated in a previous entry, all other hardware was being replaced anyways, and nobody likes to assemble new parts with corroded bolts anyways. Note the shorter shank section.
Depending on your installation this orientation of the solid front differential mount may be incorrect. Just a warning. If mounted in a 28o z, this is how it should look. If mounted in a 24o z, it should be inverted. This mistake cost me about 3o mins of under the car time for the mount's removal and re-installation, 6o$ at the driveshaft shop, and 2 days getting the driveshaft re-shortened and balanced.
I simply put the solid mount back on in the same orientation that the rubber isolator came off the differential in. This was a mistake. When I had installed the r2oo in the 24o z the first time it took a lot of effort, but I was able to align all the mounting bolts with the front isolator in the same orientation as if the r2oo were installed in a 28o z. Man up.
With the new beefy mustache bar, it would not move reward during the upcoming installation which put the front mount bolt 1.5oo" forward of the front cradle. The center cradle bolt is offset from the differential bolt holes by o.75o", so once flipped, it dropped right in. I was impressed with the exactness of where everything lined up during installation using 2 different companies solid mounts. The problem with this solution was that it placed the differential 1.5" forward as compared to how it sat when I had the driveshaft cut and balanced earlier.
I debated about removing the rear spacer between the mustache bar and the differential cover in order to set the differential back more, but other clearance issues were presented with that idea between bar and cover fins sans spacer, and I wasn't about to modify my pretty new mustache bar. That, and because of the solid nature of the mounts, the shift "back more" would have to be exact in relation to the offset of the front mount in order to work at all. Needless-to-say, I brought the driveshaft shop more business.
It was a long day.
More rear Ground Control coilover pictures. Springs are 4oo # eibach race coils, 2.5" diameter by only 8" long. They clear the 17x9.5et12 rims with 255 r-comp tires by mm's. I'm worried the shorter top hats will not allow a high enough ride height, but it's not that big of a deal to swap out later if the taller ones are ultimately needed. You can't get enough low.
The mustache bar bushings in the mounting blocks had to be pressed in in order to stay seated. I made sure to align the vice in the center of the bushing hole sleeve to prevent the sleeve from being pushed out or the bushings from twisting or ripping from an attempt at pushing them in crooked. Just as pushing it by hand, the tight fit compressed the air internally, but with the vice it vented and the bushings popped inward, seating flush.
I made sure to significantly locktite all the new hardware.
I installed the blocks onto the bar in the right high/low orientation (+/-) as marked. It's only slight, but with solid mounts the machining tolerances are very exact and a few hundreds off on one corner could cause the front mount 2 feet away not to fall exactly into it's hole. I would much rather be safe than sorry. Watch out because once pushed in, the bushings almost cover the high/low markings.
These would be used during the installation of the drop mounts, 4 upper into the car sub-frame, and 4 lower holding on the lower mount which holes the aft bushings of each control arm.


No comments:
Post a Comment