It took a while to get the exhaust installed. It is one piece with two hangers which are extremely difficult to align while being able to fit the exhaust around the other features under the car. One side would fit, causing the other to not. It's similar to solid suspension mounts.
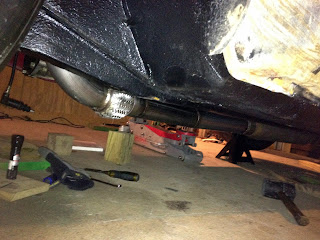


Special thanks goes to KK, help by whom saved countless hours and swearing.
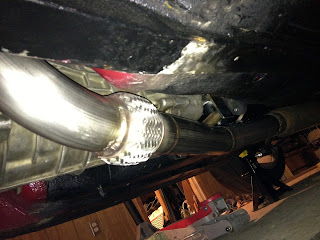
Once installed it was very evident how spot on the fitment was. Everything cleared by fractions of an inch. The flex joint was not pre-stressed as the forward flange was clamped in place. The downpipe was not pulled down by the weight of the exhaust as the flange was at the exact matching angle and location.


The complicated bend and flex cleared the underside, engine frame rails, and transmission with simplistic ease.


The mid section hung JUST under the transmission cradle. This was a slight worry as the hanger came off in transit and was re-tacked upon arrival to the welder's. On top of this, during mock up I estimated the amount of droop, none, of the new, very stiff, rubber isolators with respect to the weight of the exhaust. I also had to eyeball the forward/aft location of the arrow heads so that the rubber isolator would not be pre-stressed during installation either.


The resonator clears the floor pan and driveshaft as close as possible.


The muffler tip sits quietly in the oem rear valence cutout. I use the words muffler tip loosely as it is not really a tip at all, simply the exit tube of the muffler itself without any type of tip attached.


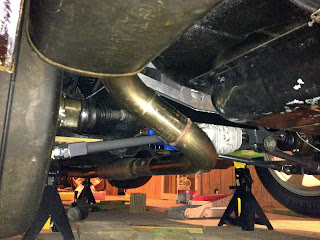
Any bigger and the magnaflow muffler wouldn't fit at this height and angle of rotation between the spare tire well and outside quarter panel.


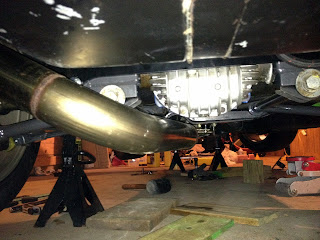
The rear hanger placed the muffler and tip at the perfect location, not to mention re-angling the entire exhaust, bringing the bend under the rear differential and halfshafts up, much closer to the car. I had to install the rear isolator onto the car and then onto the muffler hanger. I could not tighten it down until the front was installed though, and since it was slightly difficult to access once in place and possibly stuck on the muffler hanger once I attempted it first, I used every extension I had to reach the car side bolt over the rear side of the muffler from the tire well.


The inside, rear part of the muffler itself actually touches spare tire well. I may add some heat/sound/vibration dampening here to protect either surface from wear. Nothing is supported or stuck, however, and the muffler is free to move and doesn't make any noise when driving.


Yes, that's one of the -1o an aeroquip starlite nomex/kevlar braided fuel lines (that doesn't get old, I mean, it's kevlar?!) being used as the driver side fuel tank vent line. Check out the vent lines, muffler, 3" mandrel bent stainless steel tubing, dot slick, coilover, adjustable RLCA's, cv halfshafts, and mustache bar holding a finned lsd, tucked in as unassumingly as possible.


Special thanks goes to KK, help by whom saved countless hours and swearing.
Once installed it was very evident how spot on the fitment was. Everything cleared by fractions of an inch. The flex joint was not pre-stressed as the forward flange was clamped in place. The downpipe was not pulled down by the weight of the exhaust as the flange was at the exact matching angle and location.


The complicated bend and flex cleared the underside, engine frame rails, and transmission with simplistic ease.


The mid section hung JUST under the transmission cradle. This was a slight worry as the hanger came off in transit and was re-tacked upon arrival to the welder's. On top of this, during mock up I estimated the amount of droop, none, of the new, very stiff, rubber isolators with respect to the weight of the exhaust. I also had to eyeball the forward/aft location of the arrow heads so that the rubber isolator would not be pre-stressed during installation either.


The resonator clears the floor pan and driveshaft as close as possible.


The muffler tip sits quietly in the oem rear valence cutout. I use the words muffler tip loosely as it is not really a tip at all, simply the exit tube of the muffler itself without any type of tip attached.


Any bigger and the magnaflow muffler wouldn't fit at this height and angle of rotation between the spare tire well and outside quarter panel.


The rear hanger placed the muffler and tip at the perfect location, not to mention re-angling the entire exhaust, bringing the bend under the rear differential and halfshafts up, much closer to the car. I had to install the rear isolator onto the car and then onto the muffler hanger. I could not tighten it down until the front was installed though, and since it was slightly difficult to access once in place and possibly stuck on the muffler hanger once I attempted it first, I used every extension I had to reach the car side bolt over the rear side of the muffler from the tire well.


The inside, rear part of the muffler itself actually touches spare tire well. I may add some heat/sound/vibration dampening here to protect either surface from wear. Nothing is supported or stuck, however, and the muffler is free to move and doesn't make any noise when driving.


Yes, that's one of the -1o an aeroquip starlite nomex/kevlar braided fuel lines (that doesn't get old, I mean, it's kevlar?!) being used as the driver side fuel tank vent line. Check out the vent lines, muffler, 3" mandrel bent stainless steel tubing, dot slick, coilover, adjustable RLCA's, cv halfshafts, and mustache bar holding a finned lsd, tucked in as unassumingly as possible.