Showing posts with label vent hoses. Show all posts

Thursday, July 12, 2012

exhaust work two

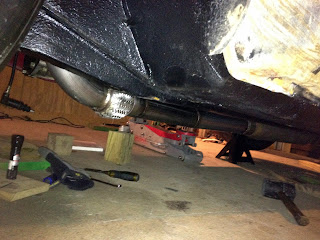
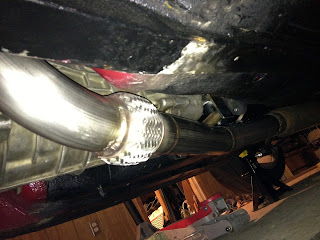
It took a while to get the exhaust installed. It is one piece with two hangers which are extremely difficult to align while being able to fit the exhaust around the other features under the car. One side would fit, causing the other to not. It's similar to solid suspension mounts.



Special thanks goes to KK, help by whom saved countless hours and swearing.

Once installed it was very evident how spot on the fitment was. Everything cleared by fractions of an inch. The flex joint was not pre-stressed as the forward flange was clamped in place. The downpipe was not pulled down by the weight of the exhaust as the flange was at the exact matching angle and location.


The complicated bend and flex cleared the underside, engine frame rails, and transmission with simplistic ease.


The mid section hung JUST under the transmission cradle. This was a slight worry as the hanger came off in transit and was re-tacked upon arrival to the welder's. On top of this, during mock up I estimated the amount of droop, none, of the new, very stiff, rubber isolators with respect to the weight of the exhaust. I also had to eyeball the forward/aft location of the arrow heads so that the rubber isolator would not be pre-stressed during installation either.


The resonator clears the floor pan and driveshaft as close as possible.


The muffler tip sits quietly in the oem rear valence cutout. I use the words muffler tip loosely as it is not really a tip at all, simply the exit tube of the muffler itself without any type of tip attached.


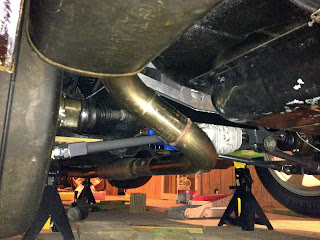

Any bigger and the magnaflow muffler wouldn't fit at this height and angle of rotation between the spare tire well and outside quarter panel.


The rear hanger placed the muffler and tip at the perfect location, not to mention re-angling the entire exhaust, bringing the bend under the rear differential and halfshafts up, much closer to the car. I had to install the rear isolator onto the car and then onto the muffler hanger. I could not tighten it down until the front was installed though, and since it was slightly difficult to access once in place and possibly stuck on the muffler hanger once I attempted it first, I used every extension I had to reach the car side bolt over the rear side of the muffler from the tire well.

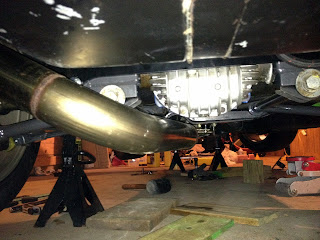


The inside, rear part of the muffler itself actually touches spare tire well. I may add some heat/sound/vibration dampening here to protect either surface from wear. Nothing is supported or stuck, however, and the muffler is free to move and doesn't make any noise when driving.


Yes, that's one of the -1o an aeroquip starlite nomex/kevlar braided fuel lines (that doesn't get old, I mean, it's kevlar?!) being used as the driver side fuel tank vent line. Check out the vent lines, muffler, 3" mandrel bent stainless steel tubing, dot slick, coilover, adjustable RLCA's, cv halfshafts, and mustache bar holding a finned lsd, tucked in as unassumingly as possible.


Sunday, June 10, 2012

fuel tank outside

As it was impractical to bring the car inside the kitchen, once the fuel tank modifications were complete, I brought it back downstairs in order to install it. I shopped around a bit prior, but ended up getting a new fuel filler hose and a full grommet set from the z store in california. It was expensive, but not as expensive as others, and had all the parts I needed. As it would turn out I would not use the doughnut shaped grommets as they did not fit with the -an vent hoses I was adapting, but it was so far off that I suspect they would not have fit the OEM replacement lines either. Since I wasn't exactly using them as intended, and they only cost an extra 2o$, no harm done, but the z store may want to look into their grommet supplier.


There's a floating ring that seals/bolts to the bottom of the fuel filler cavity inside the trunk.  Just below the top flange there is also a vent port which, combined with the floating ring that isn't going past any hole because it's structurally supported, makes it relatively difficult to push down into the car from the fuel filler cavity. Even if the port did manage to clear, the rubber/metal ring would have to clear both the upper fuel flange hole just behind the fuel door, as well as the lower in trunk hole, as it bolts up from the bottom of the car.

The fuel filler hose installs up from the bottom of the trunk. As this is the case, I assumed the old filler hose would uninstall in the same manor, but it was so dry rotted from 4o years of use that it wasn't going anywhere fast.


After unbolting the upper and lower flanges and disconnecting the vent line, I spent a few frusterating minutes trying to pull/push/fold the upper flange down past the hole into the trunk. Even if this were to succeed, it would then have to clear the lower trunk hole which would have been even more difficult as it is not easily accessed from inside the trunk. Needless to say, I couldn't even get it past the first hole.


I used my angle grinder to cut the installed, dry rotted, filler hose in two inside the trunk. After unbolting the lower flange, the bottom half simply fell out under the car. The upper half was still lodged inside the upper flange though, with it's flange above it and the vent hols port below it. Neither was compliant enough to be able to be forced past the hole, so I carefully cut the upper flange back, with a dremel this time, until it was able to be pulled through, down into the trunk, and removed entirely.


The new hose looks 1ooo times better and I'm glad I decided to replace it now. It didn't come with a vent port fitting though so I had to carefully extract the other one from the old filler hose. Using my dremel again to slowly cut back the plastic, I highly suggest a mask to be worn. It would have been too easy if it could have been simply pulled out of it's port, but it wasn't too bad, just don't cut into the fitting.


Once the fitting was free, I coated it with RTV to seal it and installed it into the new filler hose.


The new filler hose was very pliable and installed easily from the bottom of the car.

Next I test fitted the long, trunk sealing grommets over the -an lines which would connect the vent box inside the trunk with the tank itself. They fit perfectly snug over the 1o/12 -an starlite fuel lines.


Getting sidetracked under the car, and taking a break before the tank lift, here's the passenger side rear wheel fitment. It's extremely close to everything, and while the car is jacked up, the tire actually rests on the threaded coilover sleeve. Keep a lookout for fender rolling in a subsequent entry.


Here's a few shots of the lower section of the new filler hose installed. I sealed all of the flanges with RTV before assembling.


The empty hole just to the left of the filler flange on the bottom of the trunk is the hole where the front tank vent line is run. It actually passes below the trunk, and then into and through the framing, before connecting to the tank. The od of an 8 -an line, same size as my fuel lines, fits snugly though, and just so happens to have the correct id for that fitting on the tank.


New starlite nomex kevlar braided line (I just like saying that) v. 4o year old fuel tank vent line.


The grommet kit I got from the z store came with 2 which didn't exactly fit. The od of the grommets weren't exactly the same size as the id of the holes they sealed in the car, and the id's weren't exactly the same size as the od of the vent lines either. Of course, I was not using the same vent lines as would normally be prescribed, but just looking at the id hole diameters of the grommets, I thought something was off, but I can't be sure.


I still tried to use them, but with limited success. One did not fit at all (the thick one with the small id), while the other got cut in numerous ways by the very flange it was designed to protect the vent line from. They're not critical for sealing tank fumes, everything is open back there anyways. Some carefully placed tape will hopefully prevent the car bulkhead from working it's way into the line.

I put RTV on the rest of the vent line connections, and ran the lines. One worry I had with using these larger -an lines was that they would not be able to bend as needed without kinking. It worked just, and looks like the lines are pulled taught, but they're not, just bent to their limits routed through several bulkheads and turns connecting the vent box with the tank. From left to right, 8, 10, 12 -an, with the factory clamps.


Here's the lower, front vent line as installed. It fits like it was designed to be there. Be careful if using -an lines, as said before they don't have the bending radius of a vacuum line, and need to be cut a little bit longer to make the same distance between connections.


Rear vent lines, under trunk as installed. Amazingly enough, I don't have many installed pictures of the trunk side grommets, but in order to install simply fit them over the vent line and push the line from the trunk inside out. Once the tank is installed and everything is where you want it, pull the grommet back and RTV the od of the port inside the trunk, and slide the grommet back over it.  


Re-install the fuel level sender (in the correct orientation as uninstalled). RTV all three vent line ports on the tank, as well as the filler hose port.


Be careful when lifting the tank into place to not kink the passenger side rear vent hose. This hose must be connected on the tank side before the lift as it is the only one that is inaccessible afterwards. The other vent lines I ran before the lift, but didn't connect on the tank side until after. This line needs to be cut long in order to loop down from the vent point and then back up and around again in order not to kink. There's enough clearance behind the tank between it and the rear valence for it to loop around though.

Again, I apologize for the lack of installed pictures, I was so exhausted after several hours under the car supporting the fuel tank that after victory I simply went back upstairs and took a nap. I assume if you are reading this you know what an installed fuel tank on a s3o looks like well enough.

When I was younger I was once told that my hands weren't dirty enough to work on a z. This was about 1o years ago in college when my brother was selling his 35o swapped z. I showed a prospective buyer the car and he scoffed in my general direction due to my apparently unsoiled hands.


After barely recovering from all the cuts and scrapes of the fuel tank sender hole and installing the bulkhead fittings, I have even more from installing the tank. It was next to impossible to lift the tank and align it with the new fuel filler hose while trying to get it a mounting strap around it. After an entire morning, I got it all connected, by myself I might add, cuticles even more destroyed than before.


This is a fitting I had to order last minute from summit, the neighbor's dog actually found it before anyone else, and luckily left the packaging in plain sight. This is an 8-an female to 3/8" barb fitting. I had to order it in an attempt to get on the road, and as usual summit came through. Although I didn't make it to the import alliance show, it was a big help in getting the car started for the first time.

I didn't have time before the show to install the new fuel rail with remote pressure regulator. I didn't have time to make the 5 other flex lines that would have been required to connect the entire system. I didn't have time to cut, route, and mount the hard feed and return lines under the car. For now I connected the old fuel injected flex lines I had in the 28oz to the barb fitting on the pressure side of the pump. The return bulkhead however needed a -an/barb fitting as I refused to try to use the male -an threads to seal a fuel line with a band clamp.